Setting Up A Reproducible Environment
Contents
Setting Up A Reproducible Environment
By: Naeem Khoshnevis
Last Update: May 22, 2022
This blog post will review the steps to generate a reproducible environment in developing R packages and conducting research. More specifically, these steps are useful for package maintainers and contributors to set up the development environment seamlessly. Steps to set up runs on an HPC environment will require using Singularity instead of Docker. Feel free to start a new discussion if you need any specific setup for your project.
A robust reproducible environment is possible thanks to the following amazing applications and packges:
Docker and The Rocker Project,
RStudio, and

Fig. 1 Three major components of building a reproducible developing environment.
Note
Have an idea to improve this page? Let’s discuss it.
In the following, we will work on three packages, with different dependencies.
Overview
Reproducibility can be divided into three major parts:
System-level, that includes (read more):
The operating system in use,
The compiler flags,
The LAPACK/BLAS system(s) in use, and
The versions of system libraries.
Software and Application level, which mostly includes the versions of the packages in use.
Code level, which includes defining initial values of the pseudorandom number generator.
The containerization platforms (e.g., Docker or Singularity) can be used to address the system-level isolation and reproducibility. Package managers (e.g., renv or conda) can manage different package dependencies and versions. The developers should address code-level reproducibility (also known as setting a seed value) while writing the code. We will not discuss this in this post. Please see this discussion for more details.
Managing Package Dependencies
To manage the package dependencies, we use the renv R package. Please read the renv vignettes for more details. In summary:
Each folder is a project.
Each project has one lock.file.
renv takes care of updating the lock.file.
renv manages restoring the environment based on the loc.kfile.
Each project has a library folder inside renv folder.
Each user has one (or more) global package cache, which is shared across all projects. So you do not need to install one package several times for different projects (Isn’t that amazing!?)
Let’s go to our running example; we assume we are working with only one R version. Fig. 2 represents an overview of the projects, their files, and folders.
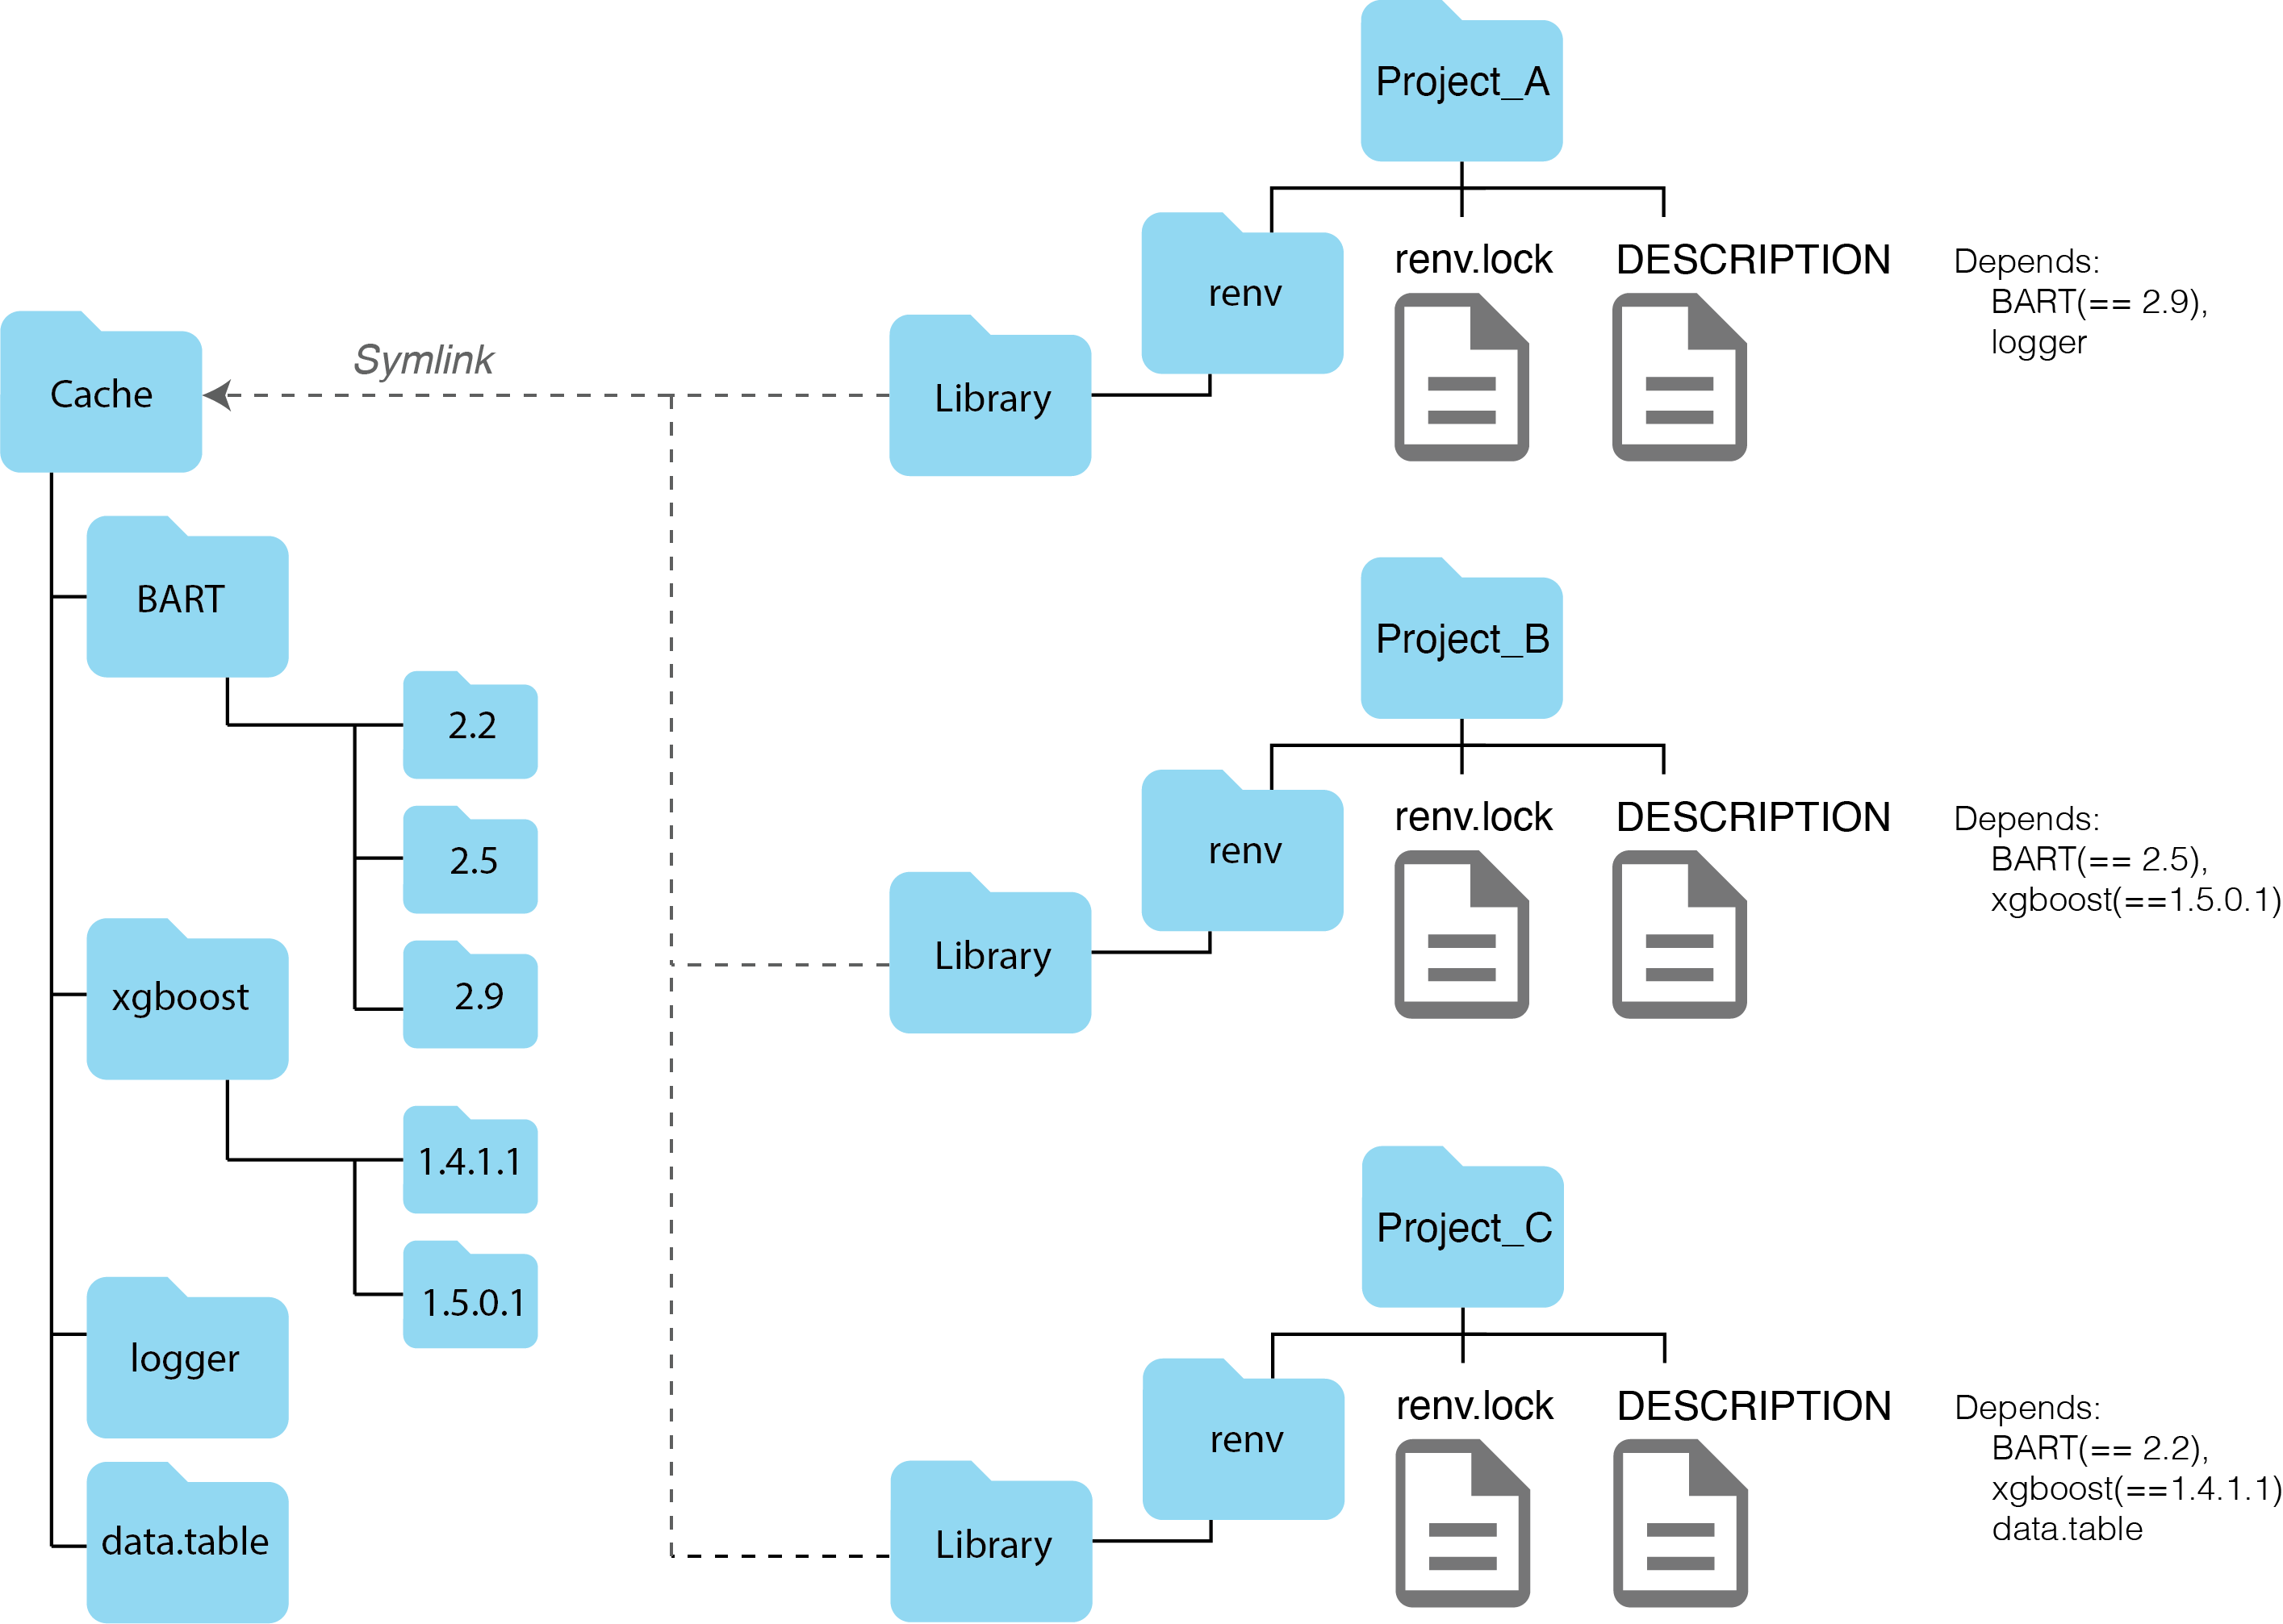
Fig. 2 An overview of three projects and a global cache folder for the packages. The renv package will generate the symlinks.
A folder (e.g., Project_A) with a DESCRIPTION file can be used as a simple example of handling dependencies. To reproduce the example, please follow the steps in the following section.
Creating A Project Folder
Make sure you have RStudio installed on your system (you can install it from here).
Open Rstudio and install the
devtoolsand therenvpackages.install.packages("devtools") install.packages("renv")
Create the
Project_Afolder.Inside the folder, create a
DESCRIPTIONfile with the following content.Package: Project_A Type: project Version: 0.0.1 Description: Project_A Description. Depends: BART(== 2.2), logger
Open the RStudio application, then from the File menu tab, select
Open Project, then chooseProject_Afolder’s path.This will convert the Project_A folder into an R project (by adding
Project_A.Rprojfile)Load the project. By using the following code:
devtools::load_all()
If you have not already installed
BARTandloggerpackages in your system, this command will raise an error. For example, in the case ofBART, it will show the following error:
ℹ Loading Project_A
Error in `abort_for_missing_packages()`:
! Dependency package(s) 'BART' not available.
Install the missing packages. At the time of preparing this post, version 2.9 of the
BARTpackage is on CRAN. Install the package using the following code.
install.packages("BART")
install.packages("logger")
Now you have all required packages installed on your system. Please note that we have not used
renvfor package management yet.
Note
Each R package can come with different dependencies. For example, in the case of the Bart package it will install nlme, nnet, survival, and any other required dependencies. In this post, we are only discussing direct dependencies.
Initializing renv
We successfully created an R project with two dependencies in the previous section. We have also installed the required packages. Now, we can use renv to take a snapshot of the current environment for future restores.
Attention
Setting up a customized cache folder gives better control over the projects. We strongly recommend providing a custom path to the global cache folder. This is an important step that needs to be done at the beginning of each session. Please see the following steps for details.
Open the project in RStudio.
Set a path for your global cache folder.
Sys.setenv(RENV_PATHS_CACHE = "path/to/your/cache/folder")
Initiate
renvin the project.renv::init()
This command will create the following files and folders:
.Rprofilefile.renv.lockfile.renvfolder. The command will also add a copy of dependent packages into the global cache folder and generate symlinks for the same packages inside therenv/libraryfolder.
You stored the project dependencies information inside the
lock.file. Having thislock.file, you can always restore this processing/development environment.
Creating Other Porjects Folders
Please follow the same steps and create the other projects folder. You can follow all steps mentioned in the Creating A Project Folder section. The only difference is the DESCRIPTION file contents.
Installing A Package with A Different Version
If you follow the steps in the Creating A Project Folder section. After running the following code in Project_B:
library(devtools)
load_all()
You will get one error and one warning message.
ℹ Loading Project_B
Error in `abort_for_missing_packages()`:
! Dependency package(s) 'xgboost' not available.
Run `rlang::last_error()` to see where the error occurred.
Warning messages:
1: Need BART == 2.5 but loaded version is 2.9
2: In (function (dep_name, dep_ver = "*")  :
  Dependency package 'xgboost' not available.
We have BART installed in the system. But, the version is different. xgboost is not installed; however, at the time of preparing this report, xgboost 1.6.0.1 is on CRAN. We need to install the package from a specific version in such cases.
Attention
Please note that we have not activated renv for this project yet. We have also activated renv for Project_A after installing the BART package. So there is a BART package in our global R library.
So we can install the missing packages:
Set up the global cache folder path
Sys.setenv(RENV_PATHS_CACHE = "path/to/your/cache/folder")
Initiate
renvThis will install
xgboostbut the one on the CRAN, not the one we need.
Install packages by version
renv::install("BART@2.5")
renv::install("xgboost@1.5.0.1")
Restart R.
Run
renv::status()
This will tell us that the project is not synchronized.
Run
renv::snapshot()
Now, if you take a look at the cache folder, you will see both versions of the BART package are available.
Follow the same steps for the Project_C.
Double-checking the Environments
We have three projects on the system that we carefully managed the dependencies. Now let’s see if we can seamlessly change the project and get the appropriate dependencies. To test that,
Open the Project in RStudio
Run
devtools::load_all()
sessionInfo()
Here are the results (only showing related info):
Project_A
logger_0.2.2
BART_2.9
Project_B
xgboost_1.5.0.1
BART_2.5
Project_C
xgboost_1.4.1.1
BART_2.2
As you can see, the projects are set up to the correct dependencies without any further action from the user side.
Managing System Dependencies
In the Managing Package Dependencies section, we discussed reproducibility at the package version level. In this section, we want to add one more isolating layer. The steps are discussed in Using renv with Docker vignette. In this section, we review those steps by providing more details.
Note
To follow these steps, you need to have Docker installed on your system. You can install Docker from here.
Understanding different topics and concepts in Docker is beyond the scope of this post. Please read more here.
Here are steps to have a running container to develop an R package:
Step 1: Create a Dockerfile
Note
A Dockerfile is a recipe to create a docker image. Although for any application we can build it from scratch, in this post, and also most other R related projects, we use images built by great effort by The Rocker Project.
FROM rocker/verse:4.1.0

LABEL org.opencontainers.image.authors="your_name@email.com"

# install routine R packages (e.g. installing SuperLearner)
RUN install2.r --error --skipinstalled --ncpus -1 \
    SuperLearner

# install specific version of renv (here 0.15.1)
ENV RENV_VERSION 0.15.1
RUN R -e "install.packages('remotes', repos = c(CRAN = 'https://cloud.r-project.org'))"
RUN R -e "remotes::install_github('rstudio/renv@${RENV_VERSION}')"

# Install Linux internal commands
RUN apt-get update \
	&& apt-get install -y --no-install-recommends \
		vim \
		zsh \
		&& apt-get clean
Step 2: Build the Image
In the terminal (and inside the same folder of the Dockerfile), Run:
docker build -t rvers .
Step 3: Run the image and create a container
In order to store the modified values, you need to map the volumes. There are two places to map:
The project folder
The global cache folder
Run the following code:
docker run -it --rm \
        -p 8787:8787 \
        -e USER=user \
        -e PASSWORD=password \
        -v "[Path to Project A on your system]:/home/user/Project_A" \
        -v "[Path to cache on your system]:/home/user/cache" rvers
Step 4: Open your browser and type
http://localhost:8787/This will pop up RStudio asking for username (
user) and password (password)Input the provided values.
Step 5: Set up global cache path
Sys.setenv(RENV_PATHS_CACHE = "/home/user/cache")
Step 6: Done!
Now, you have an isolated environment on a new OS (Ubuntu 20.04.4 LTS). Inside the RStudio Console, you can run sessionInfo() to see more details about the platform and the used BLAS and LAPACK libraries. The changes will be reflected on your localhost if you add new code. Also, the cache will be connected to your global cache (but under a different folder because of different OS), and next time, they will be loaded if needed.