Testing the package is an important part of package development. Although we are unit-testing the functions, there is always a situation that is not tested. Please feel free to try the code under different conditions. Please report the bugs as a new issue. In the following, there steps to generate synthetic data and conduct some testing.
In order to test the package, you need to have the code on your system (R (>= 3.5.0)). There are two options:
- Installing the package
- Cloning the package
- Forking the package
If you are running the code on a cluster and trying to carry out some test on scaling out, installing it is the best option. However, if you want to dig deeper and debug the code interactively, cloning the code is your choice. If you are planning to test, debug, and commit the changes, use forking. In the following, we explain all these options.
Getting the Code
Installing the Package
Use devtools::install_github to install the package. If
you do not specify the ref, it will install the master (or
main) branch. The master branch hosts the latest released
code. The latest updates are committed to the develop
branch. For more details please refer Git Branching Model in
the Developers Guide section.
library(devtools)
try(detach("package:CausalGPS", unload = TRUE), silent = TRUE) # if already you have the package, detach and unload it, to have a new install.
install_github("NSAPH-Software/CausalGPS", ref="develop")
library(CausalGPS)
The process should run smoothly. Try ?CausalGPS. It
should open the package description page under the help tab (assuming
you are using RStudio).
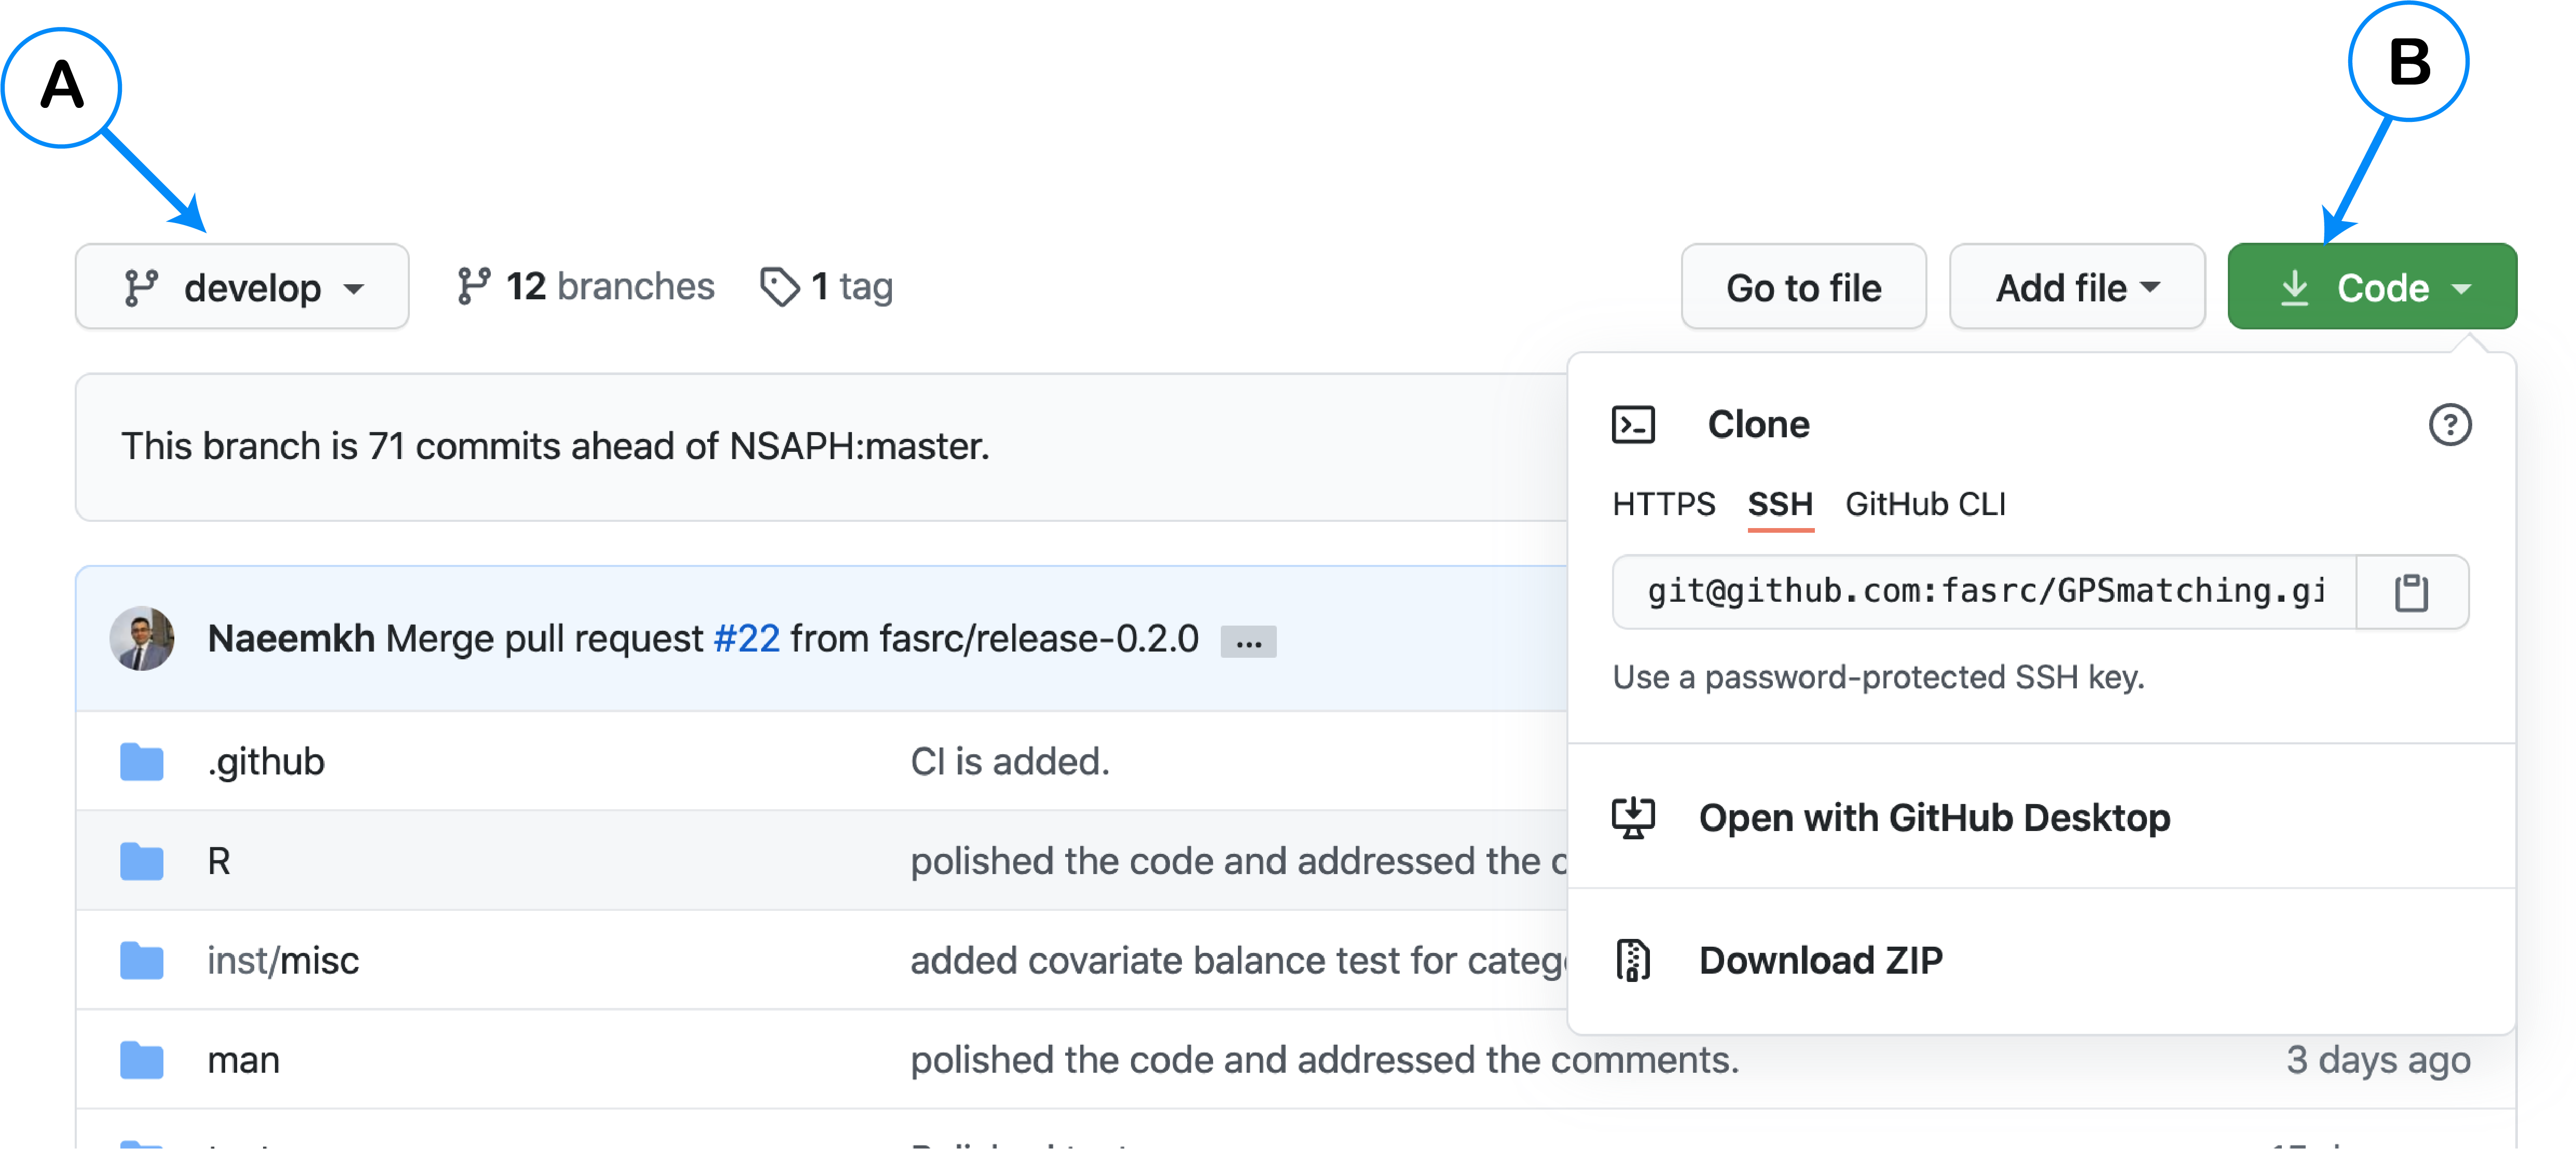
Cloning the Package
Go to the package Github
repository, at the top left (A), choose the branch that you want to
clone, then click on the Code button (B), then choose
Download ZIP. The following figure shows the buttons’
location.
After cloning the code, open one of the files using RStudio, then
change the project directory to the project directory
(Session > Set Working Directory > To Project Directory).
Package development, test, check cycle
There are some commands that you need to use during testing and debugging the package. You can read about these commands in R Packages book. For debugging and testing, you do not need to know all steps. Here is the list of commands that you need:
-
document()if you change Roxygen Skeleton (e.g., you added new argument to the function, or improved the example), rundocuments(). It will make sure that your internal documentation is updated. -
test()runs all tests that is located inside thetests/testthatfolder. Any modification to the code should be followed by runningtest()to make sure that you are not breaking existing functionality. -
check()checks many other features (e.g., whether the package can be installed without problem). You do not need to runcheck()frequently; however, we would suggest running it once you get the code and once before committing to make sure that there are no errors, warnings, and notes. -
load_all()the program source code is different than the one which is loaded on your memory (read more here). If you modify some part of the code, you need to load it on memory to takes the latest modifications effect. Runload_all()after modification and before testing. -
install()in most of the casesload_all()is sufficient. However, sometimes the links between package components are broken. It especially happens when you significantly change some part of the code, and it does not pass the tests. In such cases, you may need to runinstall().
Running Examples
You can use any causal inference studies data to test the package. The database needs to have the following attributes:
-
Y: Output value -
w: Treatment -
C: covariate matrix
The package can generate synthetic data that can be used to test different features of the package. At the current implementation, the code only generates synthetic numerical data; however, with small innovation, one can add categorical data. In the following, we present some reproducible examples that you can copy and build upon them.
Generating Synthetic Data
library("CausalGPS")

mydata <- generate_syn_data(sample_size = 10000)
str(mydata)
#'data.frame':  10000 obs. of  8 variables:
# $ Y    : num  -17 3.66 -45.88 -12.12 2.75 ...
# $ treat: num  9.74 14.88 5.22 10.19 16.65 ...
# $ cf1  : num  -0.128 0.155 -1.271 0.551 0.846 ...
# $ cf2  : num  0.2376 0.0466 0.8918 -1.8434 -2.4487 ...
# $ cf3  : num  1.5492 -0.4453 0.0718 0.8309 0.6749 ...
# $ cf4  : num  1.3738 0.8621 0.4735 0.7013 -0.0851 ...
# $ cf5  : num  -2 2 1 -2 0 1 1 2 -2 -1 ...
# $ cf6  : num  -1.794 -1.822 0.79 -0.591 2.673 ...
Estimating GPS Values for the Dataset
In the following example, first, we generate 10000 synthetic data
samples, then we feed them into estimate_gps function to
estimate their GPS values. Please note that the Y variable is not used
inside the code, and it is only provided to cbind with the generated GPS
values. You can read more about different arguments in the documentation
(?estimate_gps). In summary, - We want to run a code using
SuperLearner (sl) prediction model. Inside the SuperLearner
package, we want to use the XGBoost package. As you know, we internally
generate a customized wrapper for the XGBoost package; thus, the correct
way to activate that is by passing m_xgboost, which stands
for modified xgboost. - We requested for one thread
(nthread = 1); you can use as much as you want; the package
will use the available one and will ignore the rest of them. XGBoost
uses OpenMP backend to use all cores. Sometimes it becomes a really big
challenge on Mac systems. So if you are using Mac and do not see any
performance improvement, be aware of that. - In params, we
passed the list of parameters; the function will choose one from each
list at random and will generate a customize wrapper based on them. If
you want to use a specific value, just give a list one number (e.g.,
xgb_max_depth = c(3)). All parameters that start with xgb_
will only change XGBoost hyperparameters.
library("CausalGPS")
mydata <- generate_syn_data(sample_size = 10000)
data_with_gps <- estimate_gps(mydata[, c("id", "Y")],
                              mydata[, c("id", w")],
                              mydata[, c("id", "cf1", "cf2", "cf3",
                                         "cf4","cf5","cf6")],
                              params = list(xgb_max_depth = c(3,4,5),
                                       xgb_nrounds=c(10,20,30,40,50,60)),
                              nthread = 1,
                              sl_lib = c("m_xgboost")
                             )
Now, let’s add some categorical data. Let’s say our data belongs to 5 different years (2000 observations per year), and each year we have data from 4 different regions, including North, South, East, and West.
library("CausalGPS")
mydata <- generate_syn_data(sample_size = 10000)

year <- c(rep(c("2001"), each=2000),
          rep(c("2002"), each=2000),
          rep(c("2003"), each=2000),
          rep(c("2004"), each=2000),
          rep(c("2005"), each=2000))

region <- rep(c(rep("North",each=500),
                rep("South",each=500),
                rep("East",each=500),
                rep("West",each=500)), each=5)

mydata$year <- as.factor(year)
mydata$region <- as.factor(region)

data_with_gps <- estimate_gps(mydata[, c("id", "Y")],
                              mydata[, c("id", "w")],
                              mydata[, c("id", "cf1", "cf2", "cf3", "cf4",
                                         "cf5", "cf6", "year", "region")],
                              params = list(xgb_max_depth = c(3,4,5),
                                       xgb_nrounds=c(10,20,30,40,50,60)),
                              nthread = 1,
                              sl_lib = c("m_xgboost")
                             )
Generating Pseudo Population
Generating pseudo population (gen_pseudo_pop())is one of
the important parts of the package. It internally uses
estimate_gps() package. An acceptable pseudo population
should pass the covariate balance test. Users choose which test and what
threshold, and how many attempts. If the covariate balance test is met,
the function stops trying and returns the generated population. However,
if it cannot pass the test, it still returns what is generated with a
message to the user indicating the population did not pass the test. At
each iteration, we change the hyperparameters to modify GPS values (to
better or worse) to pass the covariate balance test. After estimating
the GPS values, we need to compile the population. There are three major
approaches to compile pseudo population, including:
- Matching
- Adjusting (not implemented)
- Weighting (not implemented)
Among different methods for testing covariate balance test, only
absolute approach is implemented.
library("CausalGPS")
mydata <- generate_syn_data(sample_size = 10000)
pseudo_pop <- generate_pseudo_pop(mydata[, c("id", "Y")],
                                  mydata[, c("id", "w")],
                                  mydata[,c("id", "cf1", "cf2",
                                            "cf3", "cf4", "cf5", "cf6")],
                                  ci_appr = "matching",
                                  sl_lib = c("m_xgboost"),
                                  params = list(xgb_nrounds=c(10,20,30),
                                  xgb_eta=c(0.1,0.2,0.3)),
                                  nthread = 1,
                                  covar_bl_method = "absolute",
                                  covar_bl_trs = 0.1,
                                  covar_bl_trs_type= "mean",
                                  max_attempt = 1,
                                  dist_measure = "matching_fn",
                                  delta_n = 1,
                                  scale = 0.5)
The second causal inference approach is weighting. Here
is an example to generate pseudo population using weighting
approach.
mydata <- generate_syn_data(sample_size = 10000)

year <- c(rep(c("2001"), each=2000),
          rep(c("2002"), each=2000),
          rep(c("2003"), each=2000),
          rep(c("2004"), each=2000),
          rep(c("2005"), each=2000))

region <- rep(c(rep("North",each=500),
                rep("South",each=500),
                rep("East",each=500),
                rep("West",each=500)), each=5)

mydata$year <- as.factor(year)
mydata$region <- as.factor(region)

pseudo_pop <- generate_pseudo_pop(mydata[, c("id", "Y")],
                                  mydata[, c("id", "w")],
                                  mydata[, c("id", "cf1", "cf2", "cf3",
                                             "cf4","cf5","cf6",
                                             "year","region")],
                                  ci_appr = "weighting",
                                  sl_lib = c("m_xgboost"),
                                  params = list(xgb_nrounds=c(10,20,30),
                                   xgb_eta=c(0.1,0.2,0.3)),
                                  nthread = 1,
                                  covar_bl_method = "absolute",
                                  covar_bl_trs = 0.1,
                                  covar_bl_trs_type = "mean",
                                  max_attempt = 1
                                  )
Further Processing
After generating a pseudo population, we can process the data for
different purposes. So far, estimating exposure rate function
(estimate_erf) is implemented.
# library("CausalGPS")
mydata <- generate_syn_data(sample_size = 10000)
pseudo_pop <- generate_pseudo_pop(mydata[, c("id", "Y")],
                                  mydata[, c("id", "w")],
                                  mydata[, c("id", "cf1","cf2","cf3","cf4","cf5","cf6")],
                                  ci_appr = "matching",
                                  sl_lib = c("m_xgboost"),
                                  params = list(xgb_nrounds=c(10,20,30),
                                   xgb_eta=c(0.1,0.2,0.3)),
                                  nthread = 1,
                                  covar_bl_method = "absolute",
                                  covar_bl_trs = 0.1,
                                  covar_bl_trs_type= "mean",
                                  max_attempt = 1,
                                  dist_measure = "l1",
                                  delta_n = 1,
                                  scale = 0.5)

erf_val <- estimate_npmetric_erf(pseudo_pop$pseudo_pop$Y,
                                 pseudo_pop$pseudo_pop$w,
                                 bw_seq=seq(0.2,2,0.2),
                                 w_vals = seq(2,20,0.5))
Steps for using precomputed data during the test
The package is being tested on different data samples, some of them are generated during testing, and some others are generated before and just are loaded. These data are located in “R/sysdata.rda” file. If you add new features to the code, you may need to use some external or pre-computed data set to test your functions. In the following, we explain the steps to append data to “R/sysdata.rda”. Please note that CRAN might reject large data sets.
Step 1: Run
check()to make sure that the file as-is satisfies all test requirements. If it raises an error, warning, or note, please address them before modifying the data. In some rare cases,check()does not pass successfully, however, test() does. This is sufficient for changing the data; however, you need to address it before submitting a pull request.Step 2: Create a backup data from the current data.
# in terminal
cp R/sysdata.rda R/sysdata_backup.rda- Step 3: Clean Global environment
- Step 4: Load current data and store the names
- Step 5: Generate your data (mydata) and make sure to add steps to reproduce that data as a comment in your test file.
- Step 6: Add new data name to
list_names. Please note the quotes. You do not need to add data, just the name.
list_names <- c(list_names, "mydata") - Step 7: Save the data.
save(list=list_names, file="R/sysdata.rda")- Step 8: Run
check()/test()to make sure that it passes all tests. If it does not pass all tests, address the problem. - Step 9: After successful
check()/pass()remove the backup file.